Top Ways to Keep Your Remodeling Project Clean and Safe in Minnesota
Renovating your home in Minnesota can be exciting, but it often leaves behind a mess. Keeping your remodel area clean and safe isn't just about appearances; it's about protecting your health and the integrity of your home. From managing dust to handling waste, a little effort goes a long way in making your project smoother and your living space healthier. Let's look at some top ways to keep your remodeling project clean and safe in Minnesota.
Key Takeaways
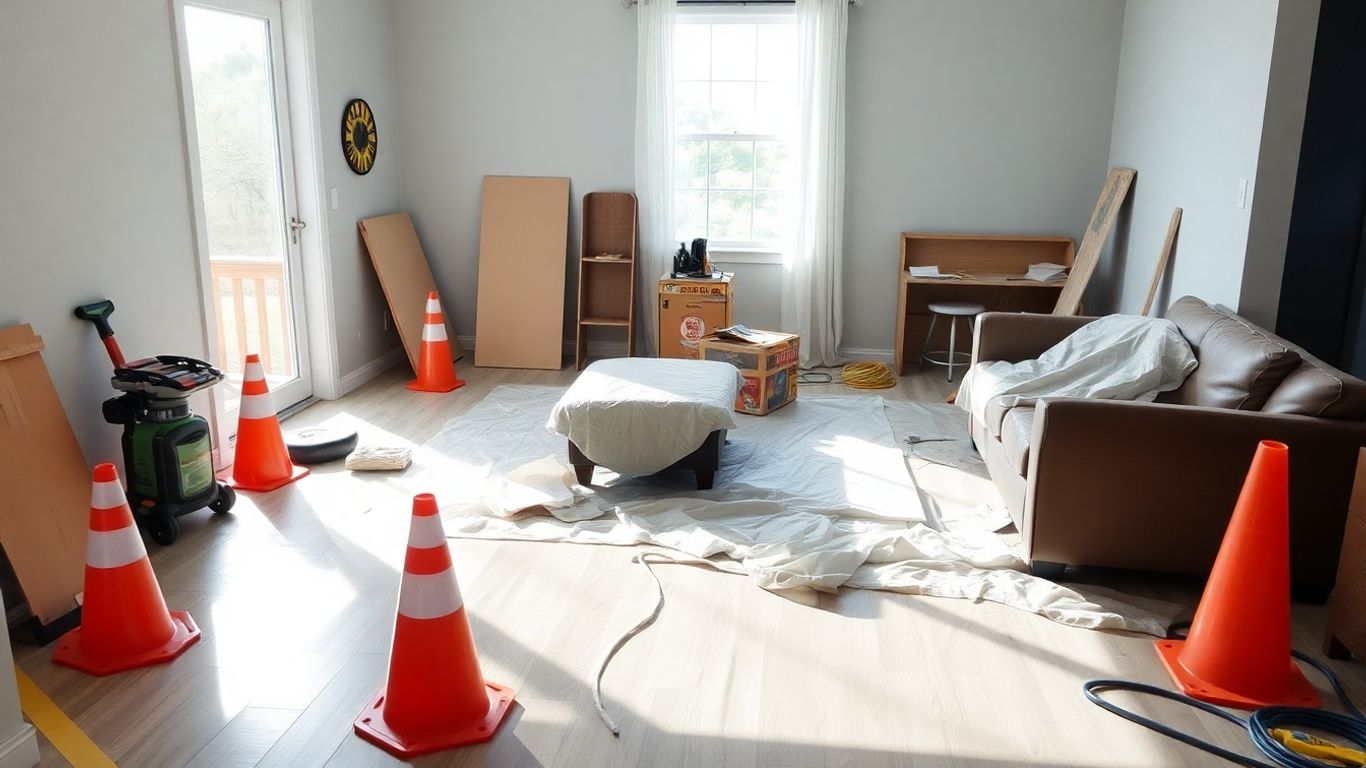
- Always wear protective gear, like goggles and masks, to avoid breathing in or getting dust in your eyes.
- Use a HEPA vacuum and damp microfiber cloths for surfaces and floors to capture fine dust effectively.
- Seal off areas not being worked on with plastic sheeting to prevent dust from spreading.
- Collect and properly dispose of all waste in heavy plastic bags, following local rules.
- Clean tools daily and wash hands frequently to maintain a safe and healthy work environment.
Wear Protective Gear
When you're tearing into a remodeling project, especially here in Minnesota where the weather can be unpredictable and dust can fly, wearing the right protective gear isn't just a suggestion, it's a must. Think of it as your first line of defense against all sorts of potential hazards. You wouldn't go out in a blizzard without a coat, right? This is kind of the same idea, but for keeping yourself safe from dust, debris, and even minor impacts.
The most important thing is to cover up as much as possible. This means things like safety glasses to protect your eyes from flying particles, sturdy gloves to keep your hands from getting cut or scraped, and closed-toe shoes, preferably work boots, to guard your feet. If you're dealing with anything that creates a lot of dust, like sanding or demolition, a good respirator is key. You don't want to be breathing that stuff in, especially if lead paint or old insulation is involved.
Here's a quick rundown of what you should consider:
- Eye Protection: Safety glasses or goggles are non-negotiable. Make sure they fit well and don't fog up too easily.
- Hand Protection: Work gloves can range from simple cloth ones for light tasks to heavy-duty leather for demolition.
- Respiratory Protection: For dusty jobs, an N-95 mask or a more robust respirator is a good idea. Check the rating to make sure it's suitable for fine particles.
- Head Protection: If there's any chance of something falling from above, a hard hat is a smart move.
- Foot Protection: Steel-toe boots offer the best protection for your feet.
- Hearing Protection: If you're using loud power tools for extended periods, earplugs or earmuffs can save your hearing.
It's also a good idea to wear older clothes that you don't mind getting dirty or damaged. Disposable coveralls are great for really messy jobs because they keep dust from getting all over your regular clothes and can be tossed afterward. And don't forget about your head – a simple painter's cap can keep dust out of your hair.
Remember to inspect your gear before each use. A cracked pair of safety glasses or a worn-out respirator mask won't do you much good. Replace anything that looks damaged or isn't fitting right. Your safety is worth the small investment in good quality gear.
Use A HEPA Vacuum
Construction dust is no joke. It's made up of tiny particles, some of which can be pretty nasty for your lungs. That's where a HEPA vacuum comes in. HEPA stands for High-Efficiency Particulate Air, and these vacuums are designed to trap even the smallest dust particles. Using one regularly during your remodel makes a huge difference in keeping the air cleaner.
Think of it this way: regular vacuums might just blow some of that fine dust right back into the air. A HEPA vacuum, on the other hand, has a special filter that catches almost all of it. You'll want to use it on floors, obviously, but don't forget about other surfaces where dust likes to settle, like upholstery or even curtains if you have them.
Here's a quick rundown on why it's so important:
- Traps Fine Particles: Catches dust, allergens, and other microscopic stuff that regular vacuums miss.
- Improves Air Quality: Less dust floating around means healthier air for you and your family to breathe.
- Prevents Settling: By picking up dust as it's created, you stop it from spreading and settling on every surface.
Make it a habit to vacuum frequently, especially after any dusty work like sanding or cutting. You might need to go over areas a couple of times, particularly if there's a lot of dust. Empty the vacuum outside when it's full, and try to do it carefully so you don't release the dust you just collected.
Don't underestimate the power of a good vacuum. It's one of those tools that really helps control the mess before it gets out of hand. It might seem like extra work, but trust me, your lungs will thank you later.
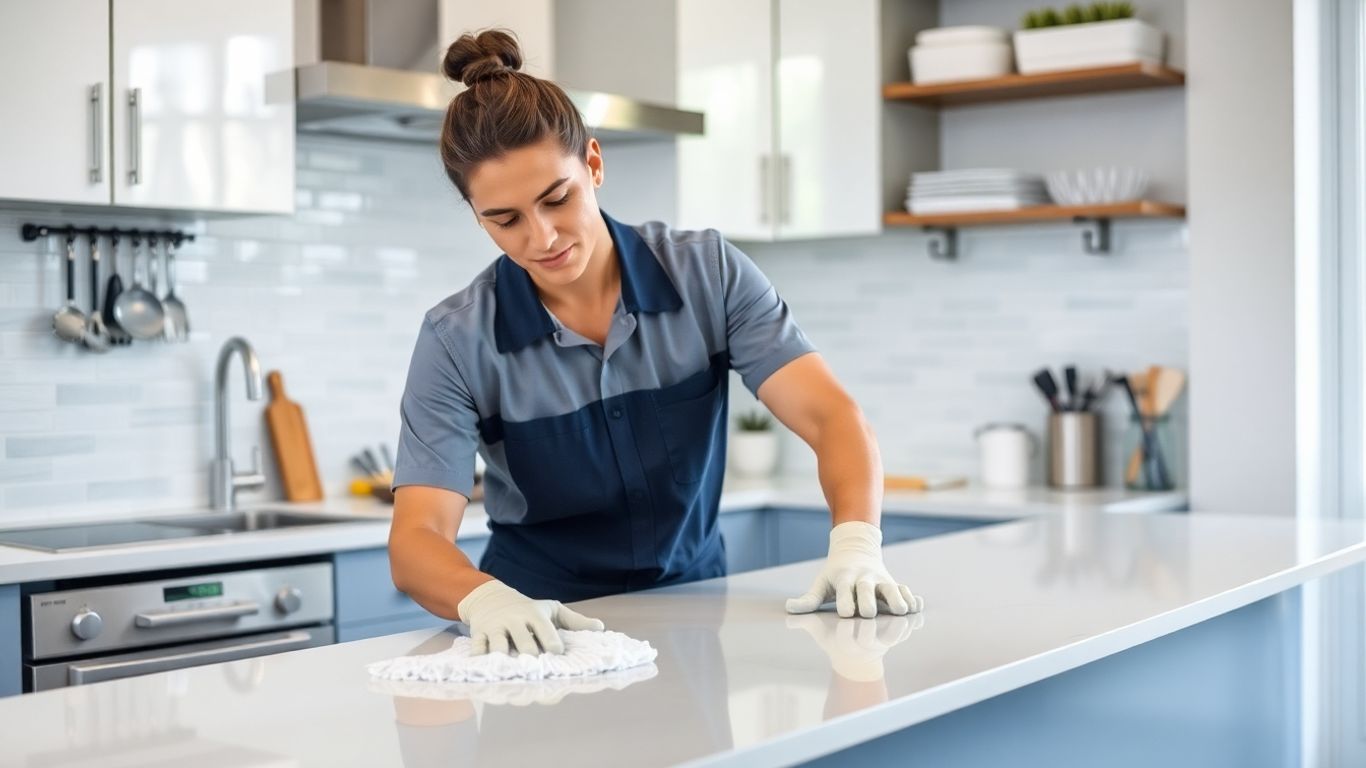
Wipe Down Surfaces With Damp Microfiber Cloths
After you've tackled the high spots and let the dust settle a bit, it's time to get those surfaces clean. Damp microfiber cloths are your best friend here. They're really good at grabbing onto fine dust particles that might still be hanging around on furniture, windowsills, baseboards, and other fixtures. Just a gentle wipe-down is usually all it takes.
Think about it – dry dusting can just push dust around, making it airborne again. But a slightly damp cloth? It traps that dust, preventing it from just floating back into the air or settling on something else you just cleaned. It’s a simple step, but it makes a big difference in getting things truly clean.
Here’s a quick rundown of what to focus on:
- Furniture surfaces (tables, shelves, cabinets)
- Window sills and frames
- Baseboards and trim
- Light fixtures (once cooled!)
- Appliance exteriors
Remember to rinse your microfiber cloths frequently or switch to a fresh one. You don't want to spread dust around, after all. A clean cloth makes for a clean surface.
Don't forget to give your cloths a good wash after you're done. You'll be surprised how much dust they pick up, even after vacuuming and sweeping.
Clean Air Vents And Replace Filters
Don't forget about your home's lungs during and after a remodel – those air vents and filters! Construction dust doesn't just stay on the floor; it gets everywhere, including getting sucked into your HVAC system. This can quickly circulate fine particles throughout your entire house, even into rooms you thought were untouched.
Here's what you should do:
- Cover Vents During Work: While the renovation is actively happening, seal off any air vents in or near the work area with plastic sheeting. This stops dust from getting into the system in the first place.
- Replace Filters Post-Work: Once the main construction is done and you're doing your deep clean, it's time to swap out your HVAC filters. The old ones have likely trapped a ton of dust. Grab some new ones – check your system's manual for the right size and MERV rating. A higher MERV rating means it's better at catching smaller particles.
- Clean Vent Grates: While you're at it, take off the vent covers and give them a good wipe-down. Dust can build up on the grates themselves, and you don't want to just blow that around.
Keeping your air vents clean and filters fresh is a simple step that makes a big difference in the air quality of your home after a renovation. It helps prevent that dusty smell from lingering and keeps your heating and cooling system running more efficiently.
Think of it like this: you wouldn't want to breathe through a dirty, clogged mask, right? Your HVAC system feels the same way. Replacing those filters and cleaning out the vents helps ensure the air you're breathing is as clean as possible, especially important if you have allergies or young kids.
Seal Off Unaffected Areas With Plastic Sheeting
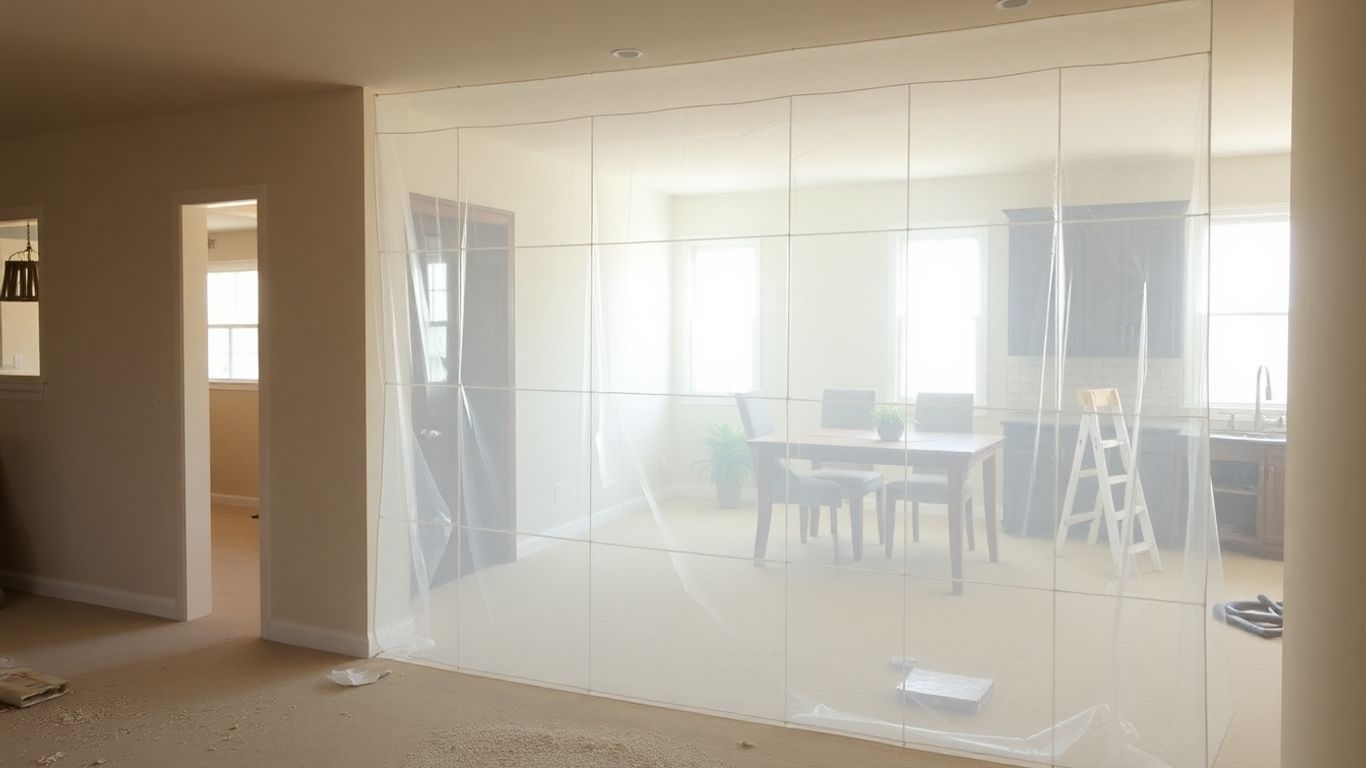
When you're tearing into a renovation, dust and debris have a way of traveling. It's like they have tiny little legs and a mission to get everywhere. To stop this dust migration, you've got to get serious about sealing off the parts of your house that aren't part of the project. Think of it like building a temporary wall, but with plastic sheeting.
Here’s how to get it done:
- Doorways are key: Cover any doorways leading from your work zone to other parts of the house. Make sure the plastic goes all the way to the floor and is taped securely along the top and sides. You might even want to create a little "airlock" with two layers of plastic if it's a high-traffic area, just to be extra sure.
- Furniture protection: If you can't move furniture out of adjacent rooms, cover it up. Old sheets work, but plastic sheeting is better for really sealing out dust.
- HVAC systems: This is a big one. Turn off your heating and cooling systems. Then, cover up any vents in or near the work area with plastic sheeting and tape them down. You don't want dust getting sucked into your air ducts and blown all over the house.
The goal is containment. You want all that mess to stay put in the renovation zone. It takes a little extra effort upfront, but trust me, it saves a ton of cleanup time later. Plus, it keeps your family and pets safer from inhaling all that fine dust. It’s a simple step that makes a huge difference in keeping your whole home clean during a messy project.
Cover Furniture With Plastic Sheeting
Don't forget about your furniture! Even if you've sealed off the main work area, dust has a way of traveling. Tightly wrapping your furniture in plastic sheeting is a smart move to protect it from settling dust and debris. Think of it like giving your couch and chairs a temporary, protective suit.
Here's a quick rundown on how to do it right:
- Remove smaller items: If you can, take smaller pieces of furniture or decor out of the room entirely. It's easier than trying to cover them.
- Drape and secure: For larger items like sofas, tables, or dressers, drape heavy-duty plastic sheeting over them. Make sure it covers them completely. Use painter's tape or duct tape to secure the sheeting around the base and any legs. You want a good seal so dust can't sneak in.
- Double up if needed: If you have particularly valuable or delicate items, consider using two layers of plastic sheeting for extra protection.
This step might seem like a hassle, but it saves a lot of cleaning time later. Trying to dust off upholstery or intricate wood carvings after the project is a real pain. Better to cover it up now and save yourself the headache.
Remember, the goal is to create a barrier. The better you seal your furniture, the less time you'll spend trying to clean it once the renovation is done.
Use Extendable Dusters For High Areas
When you're dealing with remodeling dust, it doesn't just stay on the floor. It floats up and settles on everything high up, like ceiling corners, light fixtures, and the tops of cabinets. That's where an extendable duster comes in super handy.
These long-handled dusters are your best friend for reaching those tricky spots without needing a ladder. You can extend them to get way up there and gently wipe away the dust. It's way safer than balancing on a wobbly stool, right?
Here’s a quick rundown on why they're so useful:
- Reach: They extend to grab dust from ceilings, tall windows, and the tops of walls.
- Safety: Avoids the need for ladders or step stools, reducing the risk of falls.
- Efficiency: Lets you clean large areas quickly before moving on to lower surfaces.
Think of it like this: you want to clean from the top down. Get the dust off the high spots first, so it falls to the floor where you can then vacuum or mop it up. It just makes the whole cleaning process smoother and more effective. Don't forget to give your duster a good shake outside when you're done, or even give it a wash if it's washable, so you're not just moving dust around next time.
Focus On The Floors With A Wet-Dry Vacuum
Okay, so you've tackled the high spots and wiped down the surfaces. Now it's time to give the floors some serious attention. This is where a wet-dry vacuum really shines. Unlike your regular vacuum, which might just blow fine dust around, a wet-dry vac is built to suck up both the big chunks of debris and those super-fine particles that get everywhere.
Seriously, don't skip this step; it makes a huge difference.
Here's why it's so good for post-remodel floors:
- Handles Wet and Dry: Obvious, right? But it means you can get up sawdust, drywall dust, little bits of concrete, and even if you accidentally spill some water or cleaning solution, it's no problem.
- Traps Fine Dust: These vacuums often have better filtration than standard ones, meaning less dust gets back into the air you're breathing.
- Versatile: You can use it for the initial big cleanup and then for more detailed work later on.
When you're using it, take your time. Go over the area slowly, maybe even in a couple of different directions. If you've got really dusty spots, you might need to make a few passes. Think of it as a deep clean for your floors before you even get to mopping or anything else. It's all about getting as much of that construction grit up as possible.
This tool is your best friend for getting the bulk of the mess up off the floor. It's not just about making it look clean; it's about removing the actual dust that can cause problems later.
Mop Uncarpeted Floors Thoroughly
After you've tackled the dust on higher surfaces and vacuumed up the bulk of the debris, it's time to give your uncarpeted floors some serious attention. This is where a good mop really shines, especially after construction dust has had a chance to settle. Don't just give them a quick swipe; we're talking about a thorough cleaning.
The goal here is to lift and trap any remaining fine dust particles that the vacuum might have missed.
Here’s how to get it done right:
- Choose the right mop: For most hard floors like tile, linoleum, or sealed hardwood, a microfiber mop is your best bet. They're great at grabbing onto dust. If you have unsealed wood or a more delicate surface, check the manufacturer's recommendations – sometimes a specific cleaner or a gentler approach is needed.
- Use the right cleaning solution: A simple solution of warm water and a pH-neutral cleaner is usually sufficient. For tougher spots, you might need something a bit stronger, but always test it in an inconspicuous area first. Avoid harsh chemicals that could damage your flooring or leave behind residues.
- Work in sections: Start at the farthest corner of the room and work your way backward towards the exit. This way, you won't be walking over freshly mopped areas.
- Rinse and wring frequently: Keep your mop clean by rinsing it in your bucket often. Wring it out well so you're not just spreading dirty water around. A damp mop is more effective than a soaking wet one for picking up dust.
Remember, this isn't just about making things look clean. It's about removing fine particles that can affect air quality and potentially cause irritation. Take your time and be methodical.
Don't forget to clean your mop thoroughly after you're done. Let the floors air dry completely before walking on them or putting furniture back. This final step really makes a difference in getting your space feeling truly clean and safe again.
Collect And Control Waste In Heavy Plastic Bags
As you work on your remodeling project, dust and debris are going to pile up. It’s just part of the process, right? But letting all that stuff just sit around isn't ideal. You need a plan to gather it all up and keep it contained. Using heavy-duty plastic bags is your best bet for controlling waste. Think about all the things that can become waste: bits of drywall, old paint chips, sawdust, used-up tape, dirty cloths, even bits of old flooring. These all need to go somewhere safe.
Here’s a good way to handle it:
- Bag as you go: Don't wait until the end of the day or the project to start bagging things up. As soon as you have a pile of debris or a used-up item, toss it into a heavy plastic bag.
- Double up when needed: For really dusty or sharp materials, consider double-bagging. This adds an extra layer of protection against tears and leaks, which is super important for preventing dust from escaping.
- Seal it tight: Once a bag is full, close it up securely. Use strong tape, like duct tape, to seal the opening completely. You want to make sure nothing can get in or out.
Keeping waste contained isn't just about tidiness; it's a key part of managing dust. When dust escapes from bags, it can spread throughout your home, settling on surfaces and becoming a respiratory irritant. Proper bagging stops this before it starts.
Remember, most of this renovation waste is considered regular solid waste, but it's always smart to check your local rules for disposal. You don't want any surprises when it's time to haul it away.
Dispose Of Waste According To Local Requirements
So, you've bagged up all that dust and debris from your renovation project. That's great! But before you haul it to the curb, you've got to figure out where it actually goes. This isn't a one-size-fits-all situation, and what's allowed in one town might be a big no-no in another.
Always check with your local municipality or county waste management department before you toss anything. Seriously, this is the most important step. They'll tell you exactly what their rules are for construction and demolition debris. Most of the time, renovation waste from typical home projects is considered regular solid waste, but there can be exceptions, especially if you're dealing with anything potentially hazardous.
Here’s a general idea of what you might need to do:
- Identify Waste Types: Figure out if you have anything that might be considered special waste. This could include things like old paint cans (even if empty), certain types of insulation, or materials that might have lead or asbestos. These often have specific disposal procedures.
- Locate Approved Disposal Sites: Your local waste authority can point you to the nearest licensed landfill or transfer station that accepts construction debris. Some places might have specific drop-off days or require you to schedule an appointment.
- Understand Fees: Be prepared for potential disposal fees. These can vary based on the weight or volume of your waste, and whether it's considered standard or special material.
- Follow Bagging and Containment Rules: Even if you've sealed everything up tight, some places might have specific requirements for how waste needs to be contained for transport. Double-check if they have any preferences beyond heavy-duty bags.
Don't just assume your regular trash pickup will handle renovation waste. Those guys are usually equipped for household garbage, not bags full of drywall dust and old lumber. You could end up with a hefty fine or a refused pickup if you don't follow the correct procedures.
Clean Tools Daily
Don't forget about your tools! After a day of work, especially if you've been cutting drywall or sanding wood, your tools are probably covered in fine dust. Wiping them down daily makes a big difference. It's not just about keeping them in good shape for the next job; it's also about preventing that dust from spreading around your house.
Here's a quick rundown of what to do:
- Scrape off any large debris: Use a putty knife or a stiff brush to get off any gunk that's stuck on.
- Wipe down with a damp cloth: A microfiber cloth works great here. Get into all the nooks and crannies.
- Consider a quick vacuum: For tools with lots of nooks, like saws, a quick pass with a shop vac can really help.
Think of it like this: if you don't clean your tools, you're basically just moving dust from one spot to another. It's a small step, but it really helps keep the dust under control.
Cleaning your tools at the end of each workday might seem like a chore, but it's a simple way to keep dust from migrating. It also helps your tools last longer and work better. It's a win-win, really.
Wash Hands And Face Frequently
Okay, so you've been hammering, sawing, and sanding away. Your hands are probably grimy, and you might have a bit of dust on your face. Don't just walk away and forget about it! It's super important to wash up every time you take a break or call it a day.
Think about it: you're working with all sorts of stuff, and that dust can get everywhere. If you don't wash your hands before you grab a snack or, you know, touch your face, you could end up ingesting or inhaling whatever's on them. That's not ideal, especially if you're dealing with old paint or other materials that might not be the best for you.
Here’s a quick rundown of why this is a big deal:
- Prevents Contamination: Stops you from spreading dust and debris from the work zone to other parts of your house.
- Reduces Ingestion Risk: Washing your hands before eating or drinking is key to not accidentally swallowing harmful particles.
- Personal Hygiene: It just feels better to be clean, right? Plus, it helps prevent skin irritation from dust and chemicals.
So, make it a habit. Every time you step away from the project, even for just a few minutes, head to the sink. Use soap and water, and give your face a good wipe-down too. It’s a simple step, but it makes a real difference in keeping things safe and clean during your remodel.
Dispose Of Or Clean Personal Protective Equipment
Alright, so you've been rocking the safety gear – respirator, gloves, the whole nine yards – throughout your renovation. That's awesome! But what do you do with it all when the dust finally settles? Don't just toss it all in a heap.
Your personal protective equipment (PPE) can still carry dust and debris, so handling it properly is key to not spreading that mess around.
Here’s the lowdown on what to do:
- Disposable Gear: Things like disposable coveralls, shoe covers, and N-100 masks are pretty straightforward. Carefully remove them, trying not to stir up any dust. Seal them up in a heavy-duty plastic bag, tie it tight, and then consider double-bagging it. This bag then goes with your other renovation waste for proper disposal.
- Reusable Gear: If you've got items like safety glasses or gloves that aren't meant to be tossed, they need a good cleaning. Wash them thoroughly with soap and water. For anything that might have picked up fine dust, a good wipe-down with a damp microfiber cloth after washing can help. Make sure they're completely dry before storing them.
- Work Clothes: Don't just throw your work clothes in with the regular laundry. Wash them separately, and if possible, do a pre-rinse cycle to get the worst of the dust out. It's a good idea to run your washing machine afterward with an empty load and some hot water to clean out any residual dust.
Remember, even after you've finished the main cleanup, your PPE is still a potential source of contamination. Treat it with the same care you treated the rest of your work area.
Keep Non-Workers Out Of The Work Area
This might seem obvious, but it's super important, especially if you've got kids or pets running around. That construction zone? It's not a playground. Keeping people who aren't involved in the project out of the actual work area does a couple of things. First off, it keeps them safe. Tools, dust, uneven surfaces – it's a recipe for accidents if someone isn't paying attention. Think about it, you're focused on hammering a nail, and suddenly a curious toddler wanders in. Not good.
Secondly, it helps you get the job done faster and cleaner. When you don't have to worry about someone tripping over a cord or getting in the way, you can really focus. Plus, it stops extra dust and debris from getting tracked into the rest of your house. It’s like creating a little bubble for your project.
Here’s a quick rundown of why this is a good idea:
- Safety First: Prevents injuries to family members, friends, or pets.
- Efficiency: Allows you to work without interruptions or the need to constantly supervise non-workers.
- Cleanliness: Minimizes the spread of dust and debris to other parts of your home.
Setting up some kind of barrier, even just some temporary tape or a sign, can make a big difference in reminding everyone that this area is off-limits. It’s a simple step that adds a lot to the overall safety and smoothness of your remodel.
Hire Professional Cleaners If Needed
Okay, so you've done the bulk of the work, maybe even the initial cleanup, but you're looking around and thinking, 'This is still a lot.' That's totally normal, especially after a big project. Sometimes, even with the best intentions and a good set of tools, construction dust just gets everywhere. It clings to things, settles in corners you can't quite reach, and honestly, it can be pretty overwhelming.
If the thought of tackling the final deep clean feels like too much, don't sweat it – hiring professionals is a really smart move. These folks have the gear and the know-how to get into every nook and cranny. They deal with this kind of mess all the time, so they know the tricks to make sure all that fine dust is actually gone, not just moved around.
Here’s when it might be time to call in the cavalry:
- You have respiratory issues: If you or anyone in your household has asthma or other breathing problems, letting pros handle the final dust removal is a good way to protect your health.
- Time is tight: Maybe you need to move back in ASAP, or you just don't have the hours to dedicate to a thorough cleaning.
- The dust spread is extensive: If dust has traveled way beyond the immediate work area, professionals can manage it more effectively.
- You lack the right equipment: Renting or buying specialized cleaning tools can add up. Professionals already have what they need.
Think of it this way: you invested time and money into your remodel. Getting a professional cleaning service in at the end ensures you can actually enjoy your refreshed space without worrying about lingering dust bunnies or that gritty feeling underfoot. It’s like the final polish that makes everything shine.
Use Environmentally Safe Products
When you're remodeling, it's easy to get caught up in the big picture – new cabinets, flooring, paint colors. But what about the stuff you're using to get the job done? Choosing environmentally safe products can make a big difference for both your health and the planet. Think about it: many common building and cleaning supplies can put off some pretty nasty fumes or leave behind residues that aren't great for anyone.
Opting for greener alternatives isn't just a trend; it's a smart move. This means looking for things like low-VOC (volatile organic compound) paints and sealants. These are much better for indoor air quality, which is a big deal, especially when you're spending a lot of time in a construction zone. You can also find eco-friendly adhesives, finishes, and even cleaning agents.
Here are a few ideas to get you started:
- Paints and Finishes: Look for water-based or natural paints. Many brands now offer lines specifically designed to be low or zero VOC.
- Adhesives and Sealants: Similar to paints, seek out products that are water-based or have low VOC content.
- Cleaning Supplies: Instead of harsh chemical cleaners, consider using natural alternatives like vinegar, baking soda, or plant-based cleaners.
- Materials: When possible, choose recycled or sustainably sourced materials for your project.
Making conscious choices about the products you bring into your home during a remodel can significantly reduce your exposure to harmful chemicals and minimize the environmental impact of your project. It's about creating a healthier space for yourself and your family, both now and in the future.
Install GFCI Protection For Outlets
When you're doing any kind of work around water, especially in kitchens and bathrooms, electrical safety is a big deal. That's where Ground Fault Circuit Interrupter (GFCI) outlets come in. These aren't your standard outlets; they're designed to quickly shut off power if they detect an imbalance in the electrical current, which usually means electricity is escaping somewhere it shouldn't – like through you if you touch a faulty appliance while standing on a wet floor.
It's a smart move to make sure all outlets in areas prone to moisture have GFCI protection. This is often a requirement in building codes for good reason. Think about your kitchen countertops where you might be washing dishes, or the bathroom near the sink or shower. If an appliance cord gets a little frayed, or if water splashes onto an outlet, a GFCI can prevent a serious shock.
Here's a quick rundown of why they're so important:
- Preventing Shocks: Their primary job is to cut power fast, stopping electrocution.
- Meeting Code: Most local building codes mandate GFCIs in specific areas.
- Peace of Mind: Knowing you have an extra layer of protection is always a good thing.
Installing them is usually straightforward if you're comfortable with basic electrical work, but if you're not, it's definitely worth calling in an electrician. It's a small investment for a significant safety upgrade, especially during a remodel when temporary setups or new appliances might be in play.
Ensure Major Appliances Have Dedicated Circuits
When you're upgrading your kitchen or laundry room, it's super important to think about the electrical load. Major appliances like refrigerators, ovens, dishwashers, and even high-powered microwaves draw a lot of electricity. Trying to run too many of these on a single circuit can easily trip your breaker, or worse, create a fire hazard. That's why each major appliance really should have its own dedicated circuit.
Think of it like this: a circuit is a pathway for electricity. If you overload that pathway with too many demanding appliances, it's like trying to push too much water through a small pipe – things get backed up and can break.
Here’s a quick rundown of why this matters:
- Prevents Overloads: Dedicated circuits mean each appliance gets the power it needs without affecting others.
- Increases Safety: Reduces the risk of overheating wires and potential fires.
- Improves Performance: Appliances run more reliably when they have a consistent power supply.
- Simplifies Troubleshooting: If an appliance isn't working, you know the issue is likely with that specific circuit or appliance, not a shared load.
While it might seem like an extra step or cost during your remodel, getting dedicated circuits for your major appliances is a smart move for safety and long-term reliability. It's one of those behind-the-scenes things that makes a big difference in how your home functions day-to-day.
Proper Ventilation For Ranges
When you're cooking, especially with gas ranges, you're not just dealing with heat and delicious smells. There are also byproducts like carbon monoxide and nitrogen dioxide that you don't want hanging around your kitchen. That's where proper ventilation comes in. It's all about getting those fumes out of your home and keeping the air you breathe clean and safe.
A good range hood is your best friend here. It's designed to suck up all those cooking byproducts and vent them outside. If you've got an older home or are doing a major kitchen remodel, it's worth checking if your current setup is actually doing its job. Sometimes, hoods just recirculate air with a filter, which isn't as effective as venting it all the way out.
Here's a quick rundown of why it matters and what to look for:
- Removes Harmful Gases: Prevents buildup of carbon monoxide and nitrogen dioxide, which can be dangerous.
- Controls Grease and Odors: Keeps your kitchen from smelling like last night's dinner and prevents grease from coating your cabinets.
- Improves Air Quality: Generally makes the air in your kitchen healthier to breathe.
- Reduces Moisture: Helps get rid of steam, which can prevent mold and mildew issues.
Make sure your range hood is properly sized for your cooktop. A hood that's too small won't capture everything, and one that's too big might be overkill or not work efficiently with your ductwork. Also, check that the ductwork itself is clean and clear; old grease buildup can be a fire hazard.
If you're unsure about your current ventilation system or are installing a new one, it's a good idea to consult with a professional. They can help you choose the right type of hood and ensure it's installed correctly to keep your kitchen air fresh and safe.
Proper Ventilation In Bathrooms
Bathrooms are prime real estate for moisture, and if you don't have good ventilation, that moisture can cause some serious problems. We're talking mold, mildew, and even structural damage if things get bad enough. So, when you're remodeling, making sure your bathroom has a solid ventilation system is a big deal.
The main goal here is to get that humid air out and bring fresh air in. This usually means installing or upgrading an exhaust fan. You want a fan that's powerful enough for the size of your bathroom. Too small, and it won't do much. Too big, and it might be noisy or just overkill.
Here's a quick rundown of what to think about:
- Fan Capacity (CFM): This measures how much air the fan can move. For most bathrooms, a fan with around 50-100 CFM is usually sufficient. Check the manufacturer's recommendations for your bathroom size.
- Ducting: The fan needs to vent outside, not just into the attic. Make sure the ductwork is properly installed, sealed, and slopes slightly downward towards the outside to prevent condensation buildup.
- Placement: Ideally, the fan should be located near the shower or tub, where the most moisture is generated.
- Timers and Humidistats: Consider adding a timer switch so the fan runs for a set period after you leave, or a humidistat that automatically turns the fan on when moisture levels rise.
Don't forget about the fan's noise level, measured in sones. A lower sone rating means a quieter fan, which is usually more pleasant to use. Nobody wants a jet engine in their bathroom!
Getting the ventilation right in your bathroom isn't just about comfort; it's about protecting your home from moisture damage and keeping the air healthy. It's a small detail that makes a huge difference in the long run.
Waterproof And Test Shower Pans
Okay, so you're building a new shower or redoing an old one. One of the most important, yet often overlooked, parts is the shower pan. This is the base of your shower, and if it's not done right, you're looking at water damage, mold, and a whole lot of headaches down the road. Seriously, nobody wants a leaky shower.
First off, waterproofing is key. This isn't just about slapping on some sealant. Depending on your setup, you might be using a liquid-applied membrane or a sheet membrane. The goal is to create a completely watertight barrier that directs water towards the drain. This usually involves several layers, especially around corners and where the pan meets the walls. Think of it like building a tiny, waterproof swimming pool for your shower.
After the waterproofing is all done and cured, you absolutely have to test it. This is where the "test" part of the heading comes in. The best way to do this is a flood test. You basically plug the drain and fill the pan with a few inches of water. Then, you just let it sit for a good 24 hours. Keep an eye on it. If the water level drops, or if you see any damp spots on the subfloor or ceiling below (if you have one), you've got a leak. It's way better to find out now than after you've installed tile and used the shower for a week.
Here's a quick rundown of the testing process:
- Plug the shower drain securely.
- Fill the shower pan with water, usually a few inches deep.
- Let it sit for at least 24 hours, checking for any signs of leakage.
- If the water level stays the same and no leaks appear, you're good to go!
Don't skip this step. It might seem like extra work, but a failed shower pan can cause serious structural damage and lead to costly repairs that are way more involved than just redoing the pan itself.
If you're not comfortable doing this yourself, or if you're unsure about the waterproofing process, it's totally worth it to hire a professional. They know the codes and best practices to make sure your shower is leak-free for years to come. It's one of those things where getting it right the first time saves you a ton of trouble later.
Hire Lead-Safe Certified Contractors For Pre-1978 Homes
If your house was built before 1978, there's a good chance it has lead-based paint. When you start messing with that paint during a remodel, it can create really dangerous dust. This dust can spread all over your house and is especially bad for kids.
The EPA actually requires contractors to be lead-safe certified if they're doing any work on homes built before 1978. So, if you're hiring someone, always ask if they have this certification. You can even use the EPA's website to find certified contractors in your area. It's way better to have someone trained in lead-safe practices handle the job than to risk your family's health.
Here's why it's so important:
- Expertise: Certified contractors know the specific techniques to minimize lead dust. They understand how to contain the work area, protect themselves, and clean up properly.
- Compliance: They are legally required to follow lead-safe work practices, which protects both you and their workers.
- Reduced Risk: Hiring a professional significantly lowers the risk of lead contamination in your home, especially for young children who are most vulnerable.
If you're thinking about doing the work yourself, the EPA has guidelines for DIY projects too. But honestly, for anything involving potential lead paint, it's usually best to leave it to the pros. It's just not worth the gamble.
When you hire a contractor for work in a pre-1978 home, make sure they are lead-safe certified. This is a requirement, not just a suggestion, and it's there to protect your family from lead dust. Always ask for proof of certification and check with the EPA if you're unsure.
Perform Clearance Testing For Lead Dust
So, you've wrapped up your renovation project, especially if it was in a home built before 1978. Before you let everyone back into the newly spruced-up space, it's super important to make sure it's actually clean, particularly when it comes to lead dust. This isn't something you want to guess about.
Clearance testing is basically a final check to confirm that lead dust levels are safe. Think of it like a quality control step for your home's air and surfaces after the dust-making activities have stopped.
Here's the lowdown on what that involves:
- Professional Testing: The most reliable way to do this is to hire someone certified. This could be a lead dust sampling technician, a lead-based paint inspector, or a lead-based paint risk assessor. They have the right tools and know-how to take samples and analyze them properly.
- DIY Cleanup Verification: If you did the cleanup yourself, you'll want to have done a thorough job first. This means mopping floors, vacuuming with a HEPA filter, and wiping down all surfaces with damp cloths until they're clean. After all that, clearance testing can confirm your efforts paid off.
- What They Test: Professionals will typically take dust wipe samples from floors, windowsills, and other surfaces in the work area and sometimes in adjacent rooms. They're looking for specific amounts of lead per square foot.
It's really about peace of mind. You've put in the work to remodel, and the last thing you want is for invisible lead dust to linger and potentially cause health issues, especially for kids. Getting this test done provides that extra layer of certainty that your home is safe for your family again.
Allow Airborne Dust To Settle
After you've done the initial dusting and wiping down of surfaces, it's really important to just let things be for a bit. You know, give the air a chance to calm down. All that activity – sweeping, wiping, vacuuming – stirs up a ton of fine particles. These tiny bits of drywall, wood, and who knows what else can hang in the air for a surprisingly long time.
Give it at least an hour, maybe even two, before you start your next cleaning phase, especially if you're moving to floor cleaning. This waiting period lets the dust settle back down onto surfaces where you can then deal with it properly. Trying to clean floors or lower surfaces while dust is still floating around is like trying to mop up a puddle while someone's still pouring water.
Here's a quick rundown of why this pause is so helpful:
- Reduces Recirculation: Letting dust settle means less of it gets kicked back up into the air when you start vacuuming or mopping.
- Improves Air Quality: It gives your air filters a chance to catch some of the lingering particles, though they can only do so much.
- More Effective Cleaning: You'll be able to capture more of the settled dust in one go when you finally get to it, rather than chasing it around.
Think of it like waiting for muddy water in a jar to clear. You shake it up, and it's all cloudy. But if you just let it sit, the mud sinks to the bottom, and you can see clearly again. Construction dust is kind of the same way.
So, take a break. Grab a coffee, check your phone, or just step outside for some fresh air. Your lungs, and your cleaning efforts, will thank you for it.
After we're done clearing out your space, it's a good idea to let any dust in the air settle down. This helps make sure the area is clean and safe. For all your junk removal needs, visit our website to book an appointment easily. We're here to help make your space clutter-free!
Wrapping Up Your Minnesota Remodel
So, you've put in the work, maybe even dealt with some dust and debris. That's totally normal for any home project here in Minnesota. Remember, keeping things clean as you go and doing a good job cleaning up afterward isn't just about looks. It's about making sure your newly updated space is safe and healthy for you and your family. Whether you tackled it all yourself or hired pros, a little extra effort at the end makes a big difference. Enjoy your refreshed home!
Frequently Asked Questions
What's the best way to clean up after a home renovation?
Start by sealing off areas that weren't part of the project to keep dust from spreading. Then, use a broom or long duster for high spots like ceilings and windows. After that, use a wet-dry vacuum for floors and finish by mopping any non-carpeted areas. It's also a good idea to wipe down surfaces with damp cloths.
What safety gear should I wear during cleanup?
It's important to protect yourself from dust. Wear safety goggles to protect your eyes and a good mask, like an N95, to avoid breathing in particles. Gloves are also recommended, especially if there's any chance of touching cleaning chemicals.
How can I prevent dust from spreading to other parts of my house?
You can stop dust from traveling by covering doorways with plastic sheeting. Also, cover any furniture near the work area with plastic or old sheets. It's also smart to briefly cover your air vents so dust doesn't get blown around your home.
What tools are most helpful for cleaning up construction dust?
A wet-dry vacuum is great for picking up both big pieces and fine dust. Damp microfiber cloths are excellent for wiping surfaces and trapping tiny particles. Extendable dusters help reach high places like ceilings and light fixtures.
When should I consider hiring professional cleaners after a renovation?
If the cleanup feels overwhelming, especially after a big project, or if you have breathing problems, it's a good idea to hire pros. They have the right tools and know-how to get everything really clean, saving you time and effort.
How should I get rid of the renovation waste?
Collect all the dust, debris, and used cleaning materials in heavy-duty plastic bags. Seal them up tightly, maybe even double-bagging them to prevent tears. Check your local rules for how to properly dispose of this type of waste, as it usually goes to a landfill.


Comments
Post a Comment